How To Remove Embroidery From A Backpack (7 ways)
How often do you get asked to remove Embroidery from backpacks or bags? If you are looking for how to remove embroidery from a backpack, this blog post is for you.
Embroidery removal is a great way to personalize your wardrobe without spending too much time or money.

How To Remove Embroidery From A Backpack
There are several ways to remove Embroidery or monogramming from clothing. The most common method involves using a heat press machine, but this isn’t always practical. In this blog post, I show you other methods that you can try at home.
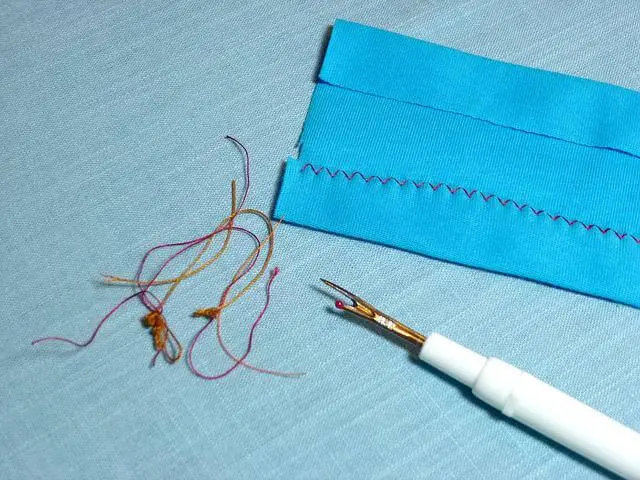
Remove Embroidery with Seam Ripper
Seam rippers are the best tool for removing Embroidery on clothes and fabric. They have sharp teeth which cut through the thread of the design. You can use them to remove any Embroidery, including:
• Monograms
• Name tags
• Personalized items like t-shirts and sweatshirts
• Any custom embroidery
You will need the following:
– One seam ripper (I recommend these)
– Fabric scissors (alternative for seam rippers)
– Thread remover
you can also use scissors, as they are the perfect alternative for seam rippers.
Step 1: Cut out the area around the Embroidery
The first thing you want to do is cut out the area around the design. This will make it easier to remove the Embroidery later. Keeping the edges clean is essential because they will be used as templates when you sew a new piece of clothing.
Step 2: Use the seam ripper to cut away the threads
Once you’ve removed the area around the design, you’ll need to cut away the threads. Start by pulling the needle out of the fabric. Then pull the thread until all the stitches come off the fabric. Next, use the seam ripper to scrape the threads off the fabric. Be careful not to damage the fabric in the process.
Step 3: Clean up the edges
Once you’ve finished scraping away the threads, you’ll want to clean up the edges of the fabric. First, fold over the edge so that it doesn’t fray. Then iron the fabric flat.
Step 4: Sew the new piece of clothing
Now that you’ve cleaned up the edges and prepared the fabric, it’s time to sew the new piece of apparel. Make sure to leave an opening where you remove the old piece of clothing. Once sewn, fold over the opening and stitch the two pieces together.
Step 5: Remove the remaining threads
After seeing the new piece of clothing, you’ll need to remove any remaining threads. First, take the fabric outside and let it air dry. When the fabric has dried completely, use the seam ripper to scrape away any remaining threads.
Remove Embroidered Clothing With Liquid Starch
Liquid starch is another option for removing Embroidery. Again, this works well if you don’t have access to a steam iron. Here’s how to use liquid starch to remove Embroidery:
Step 1: Apply liquid starch
First, apply some liquid starch to the area where the Embroidery is located. Let the starch dry completely before moving on to step 2.
Step 2: Rub the area with a cloth
Rub the area with a soft cloth to help loosen the design.
Step 3: Wipe away the excess liquid starch.
Wipe away the excess liquid with a paper towel. Don’t worry about getting everything off; wipe away the excess.
Step 4: Iron the area
After wiping away the excess liquid starch, you’ll want to iron the area. Ironing helps set the liquid starch into place.
Remove Embroidered With Iron Heated Adhesive Sheet
You can also use an iron-heated adhesive sheet if you don’t have access or a heat press machine. These sheets work well for removing Embroidery from clothing. All you need to do is follow these steps:
Step 1: Prepare the fabric.
Before starting, prepare the fabric by washing it. First, wash it out to prevent the adhesive from sticking to itself. Also, make sure to let the fabric air dry after washing.
Step 2: Place the fabric on top of the adhesive
Place the fabric on top of an adhesive sheet. You may need to trim the edges of the fabric so that the entire design fits onto the sheet.
Step 3: Heat the iron.
Next, place the iron on top of the fabric. Press down firmly to ensure that the fabric sticks to the adhesive sheet. Wait until the adhesive has thoroughly dried before peeling off the fabric.
Step 4: Peel off the fabric
When the adhesive has thoroughly dried, peel off the fabric. It would help if you now had a clean piece of clothing.
Remove Embroidered Clothing With Mod Podge
Mod podge is an excellent product for removing Embroidery. Here’s how to apply mod podge:
Step 1: Spread the glue
Spread the glue evenly across the area where the Embroidery was located.
Step 2: Smooth the surface
Smooth the surface using a sponge brush.
Step 3: Dry the item
Dry the item using a hair drier. Once the item is dry, peel off the backing paper.
Remove Embroiders From Clothes With Goo Gone
Goo Gone is a household cleaner that removes stains and dirt. However, it does work well when used to remove Embroidery. Here are the steps:
Step 1: Prepare the area.
Prepare the area by cleaning it with soap and water.
Step 2: Pour the goo gone into the stain.
Pour the goo gone into a bucket or container. Dip a cotton swab into the solution and dab the stained area. Repeat this step until all areas are cleaned.
Step 3: Wash the item
Place the item in the washing machine. Run the cycle through twice.
Step 4: Rinse the item
Rinse the item under running water.
Step 5: Dry the item
Once the item has been rinsed, hang it to dry.

Remove Embroidery through Nail Polish Remover Cotton Wool Piece Of cloth.
Nail polish remover is a non-toxic alternative to chemical-based nail polish removers. Here’s how to remove Embroidery:
Step 1: Apply the nail polish remover
Apply the nail polish remover directly to the design’s location. Allow the nail polish remover to soak in for approximately 30 minutes.
Step 2: Scrub the area
Scrub the area with a toothbrush or soft brush. Continue scrubbing until the nail polish remover has removed the ink.
Step 3: Wipe away the residue.
Wash the area using a damp towel.
Remove Embroidered Area Using Fabric Softener
A fabric softener is another effective method for removing embroidery designs from clothes. Here are the steps to follow:
Step 1: Clean the area
Clean the area using soap and water.
step 2: Add the fabric softener
Add the fabric softener to a bucket of warm water. Mix thoroughly.
Step 3: Soak the item
Soak the item in the fabric softener solution overnight.
Step 4: Dump the fabric softener
Dump the fabric softener once the item has been soaked.
Conclusion
The above methods will help you remove Embroidery from a backpack or any cloth. They’re easy to use and don’t require special equipment. Try one of these methods today!
Happy stitching

Mastering the Art of Threading A Singer Sewing Machine

How To Fix Frayed Sweatshirt Cuffs: 5 Easy Methods