Stitching Success: Mastering the Art of Sewing Leather

Indeed, there is a timeless charm to owning a classic dressmaker sewing machine. It weaves not just fabrics but also tales of an era long before the dominance of fully computerized machines. If you are fortunate to own one, you might find threading it a bit of a challenge. Yet, wouldn’t you agree that the best part of owning a vintage is operating it as it was done in yesteryears? So, let’s unravel the mystery, stitch by stitch! Get ready to learn how to thread a dressmaker sewing machine and design your own vintage-inspired garments!
Unraveling the Thread Tale! Understanding Your Dressmaker Sewing Machine

First things first, to thread a sewing machine, one has to know the machine. It’s like understanding an old language; it has its subtleties.
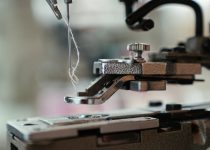
Getting Familiar With the Parts
- Spool pin – This little peg is usually located at the top right of your machine where you place your thread.
- Thread guide – These are hooks or paths that help control your thread’s direction.
- Tension discs – As the name suggests, they apply tension on the thread, ensuring even stitches.
- Take-up lever – This part moves up and down and controls the flow of thread.
- Bobbin case and bobbin – The bobbin holds the bottom thread originated from the thread spool.
Mastering a vintage sewing machine is like deciphering an old-world puzzle. Clothes aren’t the only things that are threaded here; patience, skill, and legacy are stitched together.
Setting the Stage: Preparing Your Machine

Before we dive into threading the machine, let’s ensure everything is set up correctly.
- Clean the Machine: Before you lay your hands on the machine, remember to clean it. Old machines tend to collect dust and rust and cleaning them can improve their performance.
- Ensure the Needle Is in Correct Position: Make sure the needle is inserted correctly. The flat side should be facing towards the back of the machine.
- Place your spool of thread on the Spool Pin: Position the thread on the spool pin at the top right of the machine, with the thread coming off the spool counter-clockwise.
Have you given your sewing machine a good dusting and placed the thread on the spool pin? Fantastic! Now, let’s move on.
Magic Threads: Threading the Upper Part
Ready for the fun part? Here comes the threading! Just follow along.
- Raise the presser foot: Start by raising the presser foot lever, typically located behind the machine. This lessens the tension on the thread.
- Thread Path: Begin threading by taking the thread from the spool and guiding it through the thread guide towards the tension discs.
- Through the Tension Discs: Squeeze the thread between the tension discs.
- The Take-up Lever: Next, run the thread through the take-up lever from right to left.
- Down to the Needle: Guide the thread back down and pass it through the needle eye from left to right.
Consider the possible adventures your humble thread has as it leaves its spool, meanders through the loops and hooks, and finally pierces through the eye of the needle. The journey offers a unique perspective, doesn’t it?
Going Underground: Threading the Bobbin
Let’s not forget about the bobbin, which is crucial to our threading journey. Here’s how to thread it:
- Prepare the Bobbin: Wind your bobbin with the desired thread and place it in the bobbin case in your machine.
- Thread Path: Guide the end of the thread into the small slot on the edge of the bobbin case, then guide it under the tension spring. Make sure there’s enough free thread that can be easily pulled.
- Bobbin Placement: Now, place the bobbin case back into the shuttle.
Sewing the Threads Together: Final Check and Testing

Now that your machine is all set, it’s time for the final check and test run:
- Turning the Handwheel: Turn the handwheel so the upper thread catches the bobbin thread and brings it up through the hole. Now, your sewing machine should be fully threaded.
- Testing: Test the machine on a spare piece of fabric. If the stitches are even and there’s no bunching of thread, bravo! You’ve successfully threaded your dressmaker sewing machine!
Do you hear the sound of the needle hitting cloth, creating a rhythm, while stitching yards of creativity? That’s success calling! Threading your dressmaker sewing machine might have seemed daunting at first, but with knowledge and practice, the process becomes an integral part of the joy of sewing. Welcome to the timeless art of sewing with a dressmaker machine. Happy stitching!

How to Identify Sewing Machine Needle Size in 2023 (5 ways)
Why Does My Sewing Machine Needle Keep Falling Out ( 8 common reasons)